

Hard to Study
Sometimes my cat tells me it’s time to take a break
VRRPv3 with IPv6 Support for JUNOS & Cisco IOS
Ran into a problem the other day where I was trying to configure VRRPv3 (which supports IPv6) between a Juniper MX480 and a Cisco 6509-E w/ SUP2T. The only config guide I could find for the Cisco device was this. While fairly detailed on turning on VRRP, (and remember you need this command)
fhrp version vrrp v3
it did not go into any detail for the actual IPv6 implementation! I already pinged the appropriate people but I thought I would share my config below in the meantime. The main thing to note is that when configuring IPv6 w/ VRRPv3 you have to manually add the link locals (as of the 15.1.1 ~Nov 18th, 2012).
So I won’t put a diagram here but basically just imagine a port-channel between the Cisco & Juniper that only allows vlan 2100. Here is the Cisco config->
interface Vlan2100
 ip address 201.13.110.2 255.255.254.0
 ipv6 address 2201:13:110::2/64
 ipv6 enable
 vrrp 1 address-family ipv4
  priority 120
  address 201.13.110.1 primary
 exit-vrrp
 vrrp 1 address-family ipv6
  priority 120
  address FE80::13:110:1 primary
  address 2201:13:110::1/64
 exit-vrrp
end
So the Juniper will automatically create a link-local address but you can override it (which you have to do if you are doing it on the Cisco). Here is my Juniper config->
irb {
        unit 2100 {
            description "Voice Vlan";
            family inet {
                address 201.13.110.3/23 {
                    vrrp-group 1 {
                        virtual-address 201.13.110.1;
                        accept-data;
                    }
                }
            }
            family inet6 {
                address 2201:13:110::3/64 {
                    vrrp-inet6-group 1 {
                        virtual-inet6-address 2201:13:110::1;
                        virtual-link-local-address fe80::13:110:1;
                        accept-data;
                    }
                }
This config worked perfectly, and although it looks simple now it was pretty annoying to figure out that the routers were not smart enough to sync on their link-local if they have the same virtual global or vice versa. Hopefully this will help someone out there! If you have any questions, advice, etc make comments below. Thanks.
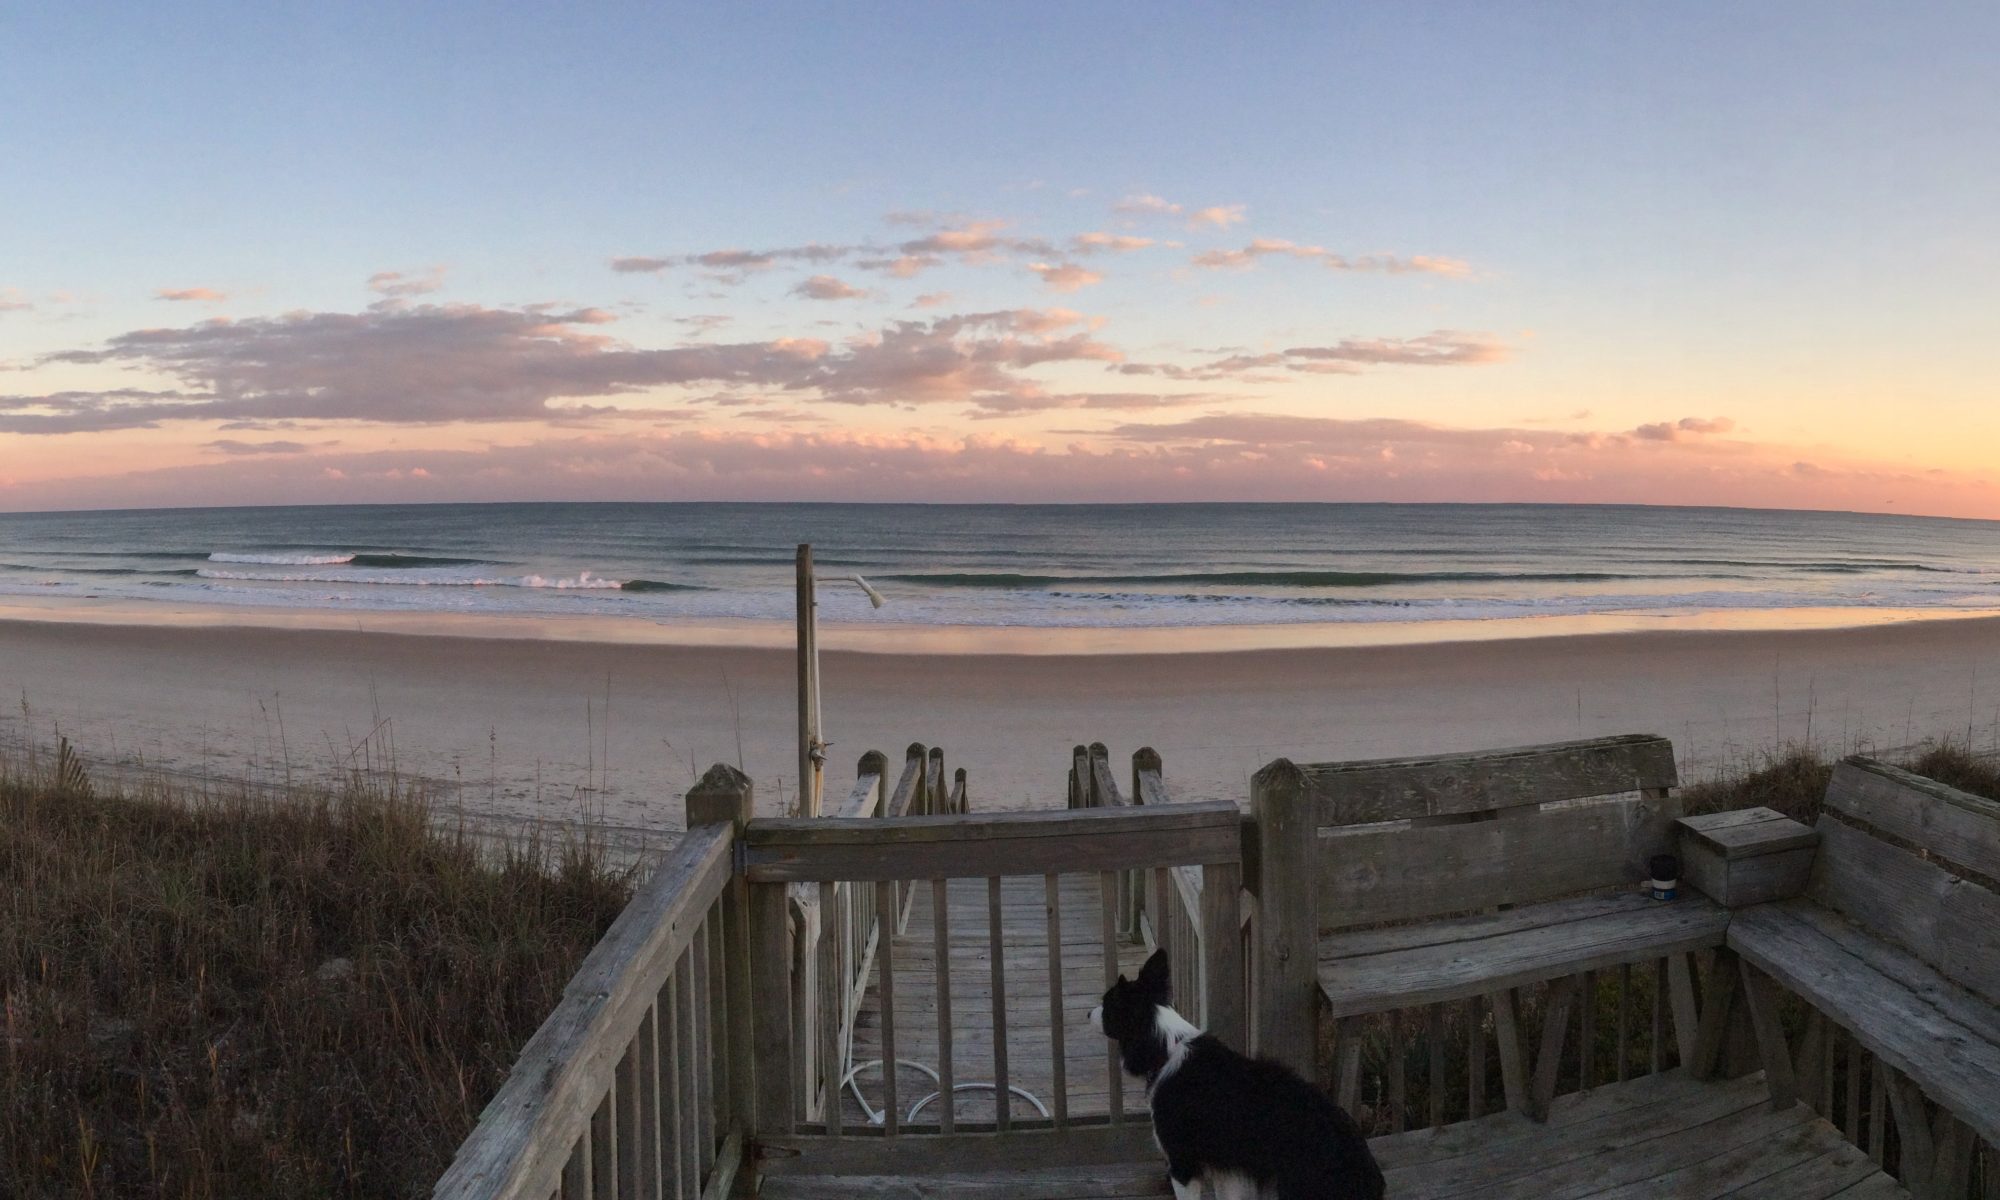
Exploring Antelope Island
This week I visited my wife while she was in Salt Lake City for an interview. We took a trek up to Antelope Island, something I had read about and really wanted to see. To get to the island we crossed a long causeway near Syracuse, Utah. The causeway had a sign which indicated there was an AM station we could listen to. Listening to the station provided some helpful information (such as park, hours) as well as educational information (such as salinity on the right versus left sides of the causeway). Once reaching the island we were in an alien landscape that literally blew my mind. I don’t think I have ever been so impressed at a landscape. It felt like we were on an alien planet. We took the road to the right as we entered the island and up to a point that overlooked buffalo point and the lake. The below panoramic picture was taken on that point (I think it was called Egg Island overlook according to this map).
The Picture (click to blow it up)

Installing the ReadyLogo Tahi Scripts to FreeBSD 9.0 utmp.h bug
Hello all. Last week I was upgrading one of our vmware templates to FreeBSD 9.0 to conduct ReadyLogo testing via the Tahi scripts and stumbled across a bug where I could make v6eval compile correctly. Basically it looks like this->
freebsd-9-USGv6# cd v6eval-3.3.2

freebsd-9-USGv6# make

===> lib (depend)

===> lib/Cm (depend)

rm -f .depend GPATH GRTAGS GSYMS GTAGS

rm -f .depend

mkdep -f .depend -a -DYYDEBUG -I. -I/usr/local/include CmTypes.cc BtObject.cc BtArray.cc BtList.cc BtSet.cc CmQueue.cc CmAgent.cc CmMain.cc CmSocket.cc CmFdSet.cc CmFdMasks.cc CmString.cc PerfCollect.cc Timer.cc CmDispatch.cc CmReceiver.cc timeval.cc CmToken.cc CmMatch.cc CmLexer.cc

CmMain.cc:51:18: error: utmp.h: No such file or directory

mkdep: compile failed

*** Error code 1

Stop in /v6eval-3.3.2/lib/Cm.

*** Error code 1

Stop in /v6eval-3.3.2/lib.

*** Error code 1

Stop in /v6eval-3.3.2.

freebsd-9-USGv6#
I sent out an email to Ed Schouten of the FreeBSD project (who is in charge of integrating the new utmpx.h now that utmc.h has been deprecated) and he was able to help me in less than an hour (wow!). You can tell that Ed Schouten is the person if charge of this by doing this command head /usr/include/utmpx.h. I also asked him why he was being so helpful and besides being a great guy he has this to say->
Though utmpx is quite an improvement over the utmp stuff we had in 8, it
broke quite a lot of ports (about a hundred or so). I fixed quite a lot
of them, but at some point I decided to stop fixing them until people
contacted me about them. That way I know which ports are used and which
are not. Many of the broken tools are (or should be) used so little in
practice, that we’d better just sit back and watch them die. 😉
.
Installation / Fix
Go to the directory of the v6eval port (/usr/ports/net/v6eval) . You then do:
fetch -o files/patch-utmpx http://80386.nl/pub/v6eval.txt

make clean

make install clean
I have attached the patch here:v6eval.diff in case it is not on his website anymore.
Also for me it still would not compile so I had to do->
 make TRYBROKEN= clean

make TRYBROKEN= install clean
Comment below if you have any problems!
How to mount a Windows samba share with FreeBSD automatically
A problem at work the other day was every time our virtual machine cluster went down we had a bunch of virtual FreeBSD boxes that had to be manually connected one by one to our windows share to offload reports. I wanted to make this happen automatically on boot since it was always the same window samba share.
1) You need to add a line to your fstab file located in /etc/fstab
//USERNAME@SERVER/Mount_Folder /blah smbfs rw,noauto 0 0
2) create a file called .nsmbrc located here /root/.nsmbrc
and add your credentials like the example file states in /usr/share/examples/smbfs/dot.nsmbrc (discovered by doing a “man smbfs”)
[SERVER]
addr=x.x.x.x

[SERVER:USERNAME]
password=xxxx
3) finally we need to create a script that runs this on boot, fortunately someone has already done this on the FreeBSD project
the file is located here: http://www.freebsd.org/cgi/cvsweb.cgi/src/contrib/smbfs/examples/smbfs.sh.sample. This file simply parses through your fstab and mounts each one (fairly easy to figure out, especially if you know awk)
you need to put the file in /usr/local/etc/rc.d/ and give the file executable permissions
here is the code
#!/bin/sh
#
# $Id: smbfs.sh.sample,v 1.3 2001/01/13 04:50:36 bp Exp $
#
# Location: /usr/local/etc/rc.d/smbfs.sh
#
# Simple script to mount smbfs file systems at startup.
# It assumes that all mount points described in fstab file and password
# entries listed in /root/.nsmbrc file. See mount_smbfs(8) for details.
#

mount="/sbin/mount -o -N"
umount=/sbin/umount
HOME=/root; export HOME
vols=`awk -- '/^\/.*[[:space:]]+smbfs[[:space:]]+/ { print $2 }' /etc/fstab`

case "$1" in
start)
	echo -n "smbfs: "
	for vol in ${vols}; do
		$mount $vol
		echo -n "$vol "
	done
	;;
stop)
	echo -n "unmounting smbfs mount points: "
	for vol in ${vols}; do
		$umount $vol
		echo -n "$vol "
	done
	;;
*)
	echo "Usage: `basename $0` {start|stop}" >&2
	exit 64
esac

echo "Done"
4) Now when you reboot you should be good to go!
#reboot
Notes:
1) the SERVER name is entirely dependent on the .nsmbrc file, my server did not have its name in DNS so it was confusing me that it wanted a server name for this config file…I was previously using the IP address of my server and it kept confusing it, I am sure there are other ways to fix this by just using the IP but this was a simple fix.
2) I read from a couple places that the username had to be capitalized in the .nsmbrc (just like the server), what I found out that the username for samba shares is not case-sensitive so just go ahead and capitalize it (for me it was ADMINISTRATOR versus what I was trying Administrator)
So basically make sure the SERVER and USERNAME is the .nsmbrc and fstab file match exactly and are both capitalized. Someone comment if they know another way around this.
Watermarks on Photos
So a question I get asked a lot is how to easily (by easily I mean not using some fancy program like Photoshop or Aperture) resize photos and add a water mark. My primary computer is a Apple Computer but I expect Windows has plenty of programs that do the same thing. Apple provides a program for free called “Easy Batch Photo” which is very good if you don’t have photoshop or don’t really want to be bothered with opening it. The program is also easy to use, anyone that can use a computer should be able to use it. I would write a how-to but the program is probably one of the easiest I have ever used. Download Here. The photos on my wedding album were water-marked using this program. The graphic however that I put on them was made in Photoshop.
Setting up Wireshark on Mac OSX
Here is the complete guide, because so many ‘complete guides’ were missing a step or two that I needed.
1) Download the DMG from http://www.wireshark.org/download.html. Unpack it.
2) Drag the Wireshark icon onto to the Applications alias.
3) Open the Utilities folder.
4) Drag the contents of the Command Line folder to /usr/local/bin
5) Drag the ChmodBPF folder onto the StartupItems alias.
Path is /Library/StartupItems/ChmodBPF if the alias does not work
(you can use finder, click go, click “Go To Folder”)
(this files changes the permissions of /dev/bpf* in order to capture from interfaces, by dragging it here it does this every time you reboot)
6) If you’re running as an admin user you will see a list of network interfaces in Wireshark in the “Interface List”. That’s good and you’re ready to start capturing packets.
However, if you don’t see any available interfaces, you’re probably running as a non-admin. If you plan on running as a non-admin when you use Wireshark in the future, you need to make one more change. The problem here is that theChmodBPF start-up item we installed earlier (that changes permissions on/dev/bpf*) only works for users in the admin group. So, we need a way of allowing the user you’re running as to at least read stuff in /dev/bpf*.A simple solution, and you can do this to check and see if you can capture with this change is to simply do sudo chmod o+r /dev/bpf*. That works, but it allowsany user on your machine to sniff packets. A better solution is to just add a line to the ChmodBPF script to chown (change the owner of) those things to the user you want to run as:
- Open the
ChmodBPFscript, which is located in/Library/StartupItems/ChmodBPF/ChmodBPF, in a text editor. - Add a
chownline so that the file looks like this: - But replace
foobarhere with the user you want to run Wireshark under. - Save the file.
 ...
         chgrp admin /dev/bpf*
         chmod g+rw /dev/bpf*
         chown foobar:admin /dev/bpf*
 }
 ...
7) If you’re doing a fresh Wireshark install on Snow Leopard (Mac OS X 10.6), it appears that the ownership of the ChmodBPF files needs to be changed. So, fire up the terminal and do the following:
cd /Library/StartupItems
sudo chown -R root:wheel ChmodBPF
8.) Now double check the security settings in your startup error, you may have get an error like this if you forgot to do so
"Insecure Startup Items folder detected.

Items in the Startup Items folder ("/Library/

StartupItems/") have not been started because the

folder does not have the proper security settings."
so open up a terminal, go to /Library/StartupItems/
do a ls -l and make sure then everything is set to the same permission 755 which will look like
drwxr-xr-x
you can always change the permissions of everything in the folder by doing this
sudo chown -R root:wheel /Library/StartupItems

sudo chmod -R 0755 /Library/StartupItems
if you see an @ symbol you need to do a ls -l@ and look for com.apple.quarantine, this means that OS X has quarantined this file because it has not given permission to run it yet (untrusted). Just like when you download a new app from the internet for the first time OS X will ask you with a prompt “blah is an application downloaded from ther Internet. Are you sure you want to open it?” you will need to do this here, only via the command line.
Remote the quarantine with this command
xattr -r -d com.apple.quarantine file-path
so in our case
xattr -r -d com.apple.quarantine /Library/StartupItems/ChmodBPF
9) Restart your computer, make sure there are no errors, run Wireshark and make sure you can see interfaces to capture from. Email me or comment below to fix any problems with this how to.
How to add line numbers to VI by default
I am running on Snow Leopard 10.6.6. at the time of this post. VI is a handy tool to use because it is installed on every single non-windows box I have ever seen. I originally only used nano and I have found out that nano is not everywhere.
1) you need to locate your .vimrc file, on osx I just did a locate vimrc and got this
bash-3.2# locate vimrc
/opt/local/var/macports/sources/rsync.macports.org/release/ports/editors/vim-app/files/gvimrc
/opt/local/var/macports/sources/rsync.macports.org/release/ports/editors/vim-app/files/vimrc
/usr/share/vim/vim72/gvimrc_example.vim
/usr/share/vim/vim72/vimrc_example.vim
/usr/share/vim/vimrc
2) now just vi open that file
I did a vi /usr/share/vim/vimrc and then added the line set number to the end here is how my file looks->
" Configuration file for vim
set modelines=0         " CVE-2007-2438

" Normally we use vim-extensions. If you want true vi-compatibility
" remove change the following statements
set nocompatible        " Use Vim defaults instead of 100% vi compatibility
set backspace=2         " more powerful backspacing

" Don't write backup file if vim is being called by "crontab -e"
au BufWrite /private/tmp/crontab.* set nowritebackup
" Don't write backup file if vim is being called by "chpass"
au BufWrite /private/etc/pw.* set nowritebackup

set number
3) now quit and save, everytime you open vi it will show line numbers, to turn them off you can do a :set nonumber
Netflix Error Code n8156-6013
Here is a problem I have come across twice now. Every time you migrate Apple computers it will corrupt a file so that Netflix will no longer work. So for me I migrated from a Macbook pro to a Mac Mini then back to a Macbook Pro over a series of 3 years. It seems like this is an on going issue so here is the simple fix.
The file that gets corrupted is the mspr.hds file, you can find it here.
HD > Library > Application Support > Microsoft > PlayReady > mspr.hds
Simply delete it and you are good to go. A lot of sites seems to recommend you keep the old mspr.hds by renaming it something like mspr.hds.old then just refreshing your browser that you watch Netflix in. I don’t really see a reason for that, you can always reinstall Microsoft Silverlight.
For me the fix worked instantly, comment below if you need more help. Remember that Netflix’s help line is actually really easy to reach and will help you out.